If you’re wondering how to change a light fitting then look no further! Our experienced Taskers set-by-step guide on how to fit a light fitting explains everything you need to know, including how to change a bulb in a ceiling light, how to change a bulb in a recessed light and more. Have a read below.
How to change a light fixture
Warning – safety first
Working with electricity can have fatal consequences if you don’t turn the power off beforehand. That’s why it’s really important to switch off the power from the mains unit or fuse box before you begin.
We always recommend carrying out any electrical work during daylight hours and if you’re unsure which power circuit you are working on, it’s safest to turn off all the circuit breakers. After doing this, we advise checking that the circuit is dead by using a non-contact voltage tester.
Step-by-step guide
Tools required to change a light fitting
- Non-contact voltage tester
- Multi-bit screwdriver
- Wire strippers
- Wire connectors
- Pliers
- Stepladder
Difficulty level: moderate
Time required: 1-2 hours
Step 1: Turn the power off
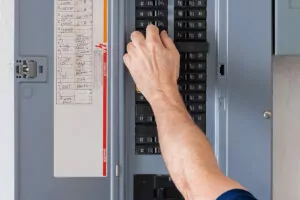
Before you do anything, you need to turn the power off. Locate your fuse box and flick the circuit breaker switch off for the area you are working in. If you are unsure which circuit breaker the room is on, turn everything off.
Carry out the task during daylight hours so you still have light, or use a torch throughout the process.
Step 2: Remove the old fixture

Start by unscrewing the pendant cover or recessed light fitting with a screwdriver. If you are removing a light fixture from the ceiling, you will need to use your stepladder to safely reach the light fixture.
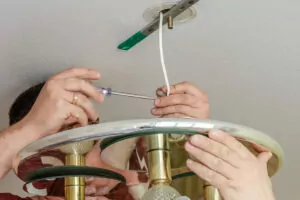
Step 3: Check the wires
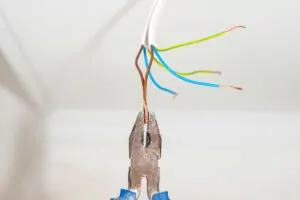
At this point the light fitting will be hanging down, so you might need a helping hand to hold it depending on the size. Take a photo of how the light is wired so you can use this for reference.
Now use your non-contact voltage tester to check whether there is any electricity running through the wires, then (provided there is no electricity) undo the wires and remove the light fitting.
Step 4: Connect up the wires to the new light fitting
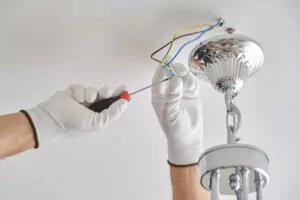
Now it’s time to connect up the new light fixture. Always read the safety instructions that came with the fitting beforehand. If your fitting comes with a mounting bracket, screw this to the ceiling, then take a moment to familiarise yourself with the wires:
- Black or blue = neutral
- Red or brown = live
- Yellow and green = earth
If the wires are damaged or the flex is too long, cut the ends of the wires with your pliers, then strip off around 5 inches of insulation to expose new copper wire.
Refer to your photo to check how the old light fitting was wired up. Connect the live wire to the live connector block, neutral to neutral connector block and the earth wire to the earth connector block. Important: make sure all the wires are screwed in tightly.
Step 5: Install new light fixture
Now the wires are connected, push the wires into the ceiling box and screw your light fitting into place, making sure to follow the instructions.
Step 6: Add a light bulb
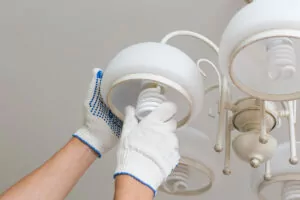
Your light fitting may have come with a light bulb. If not, check in the instructions which light bulb you need and fit it into the socket.
If it’s a screw fitting, turn the bulb clockwise until it’s securely in place. If it’s a bayonet fitting, press and turn clockwise until it locks into place.
Once everything is secure, go back to the fuse box and turn on the power. Flick the light switch to check that the light is working. If the light doesn’t turn on, you will need to turn off the power again, unscrew the fitting and check the wire connections.
There you have it, our 6-step guide for changing a light fitting. If you have any concerns at any point during the installation, put your mind at ease and hire an experienced Tasker to help.